
Welcome to Day 2 of Our Renovation Story!

Yesterday, I told y’all that one of our big goals with this renovation was to kick the small, choppy rooms to the curb and open her up.
Well, today, I’m talking about how we took down two huge walls and created an open concept. I know I said I’d be talking about how we created the faux beams in the openings, but I realized today it was just too much for one post. So, that will be up next tomorrow.
Looking back through pictures and getting ready for this post gave me some mixed emotions. It depressed me a little remembering the rough times living through a renovation, but it also made me feel pretty triumphant to have come out on the other side.
By yesterday’s floorplans, you knew this house was filled with small choppy rooms, but here are some before shots as evidence.
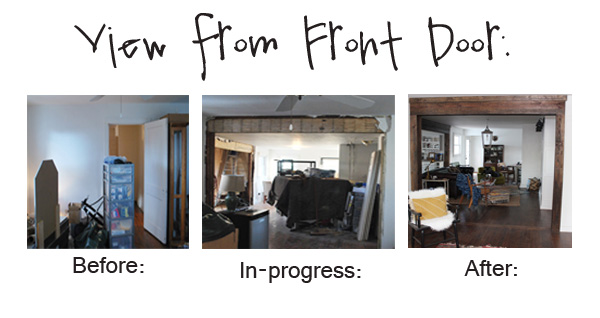
When you first came in the front door, you saw this.
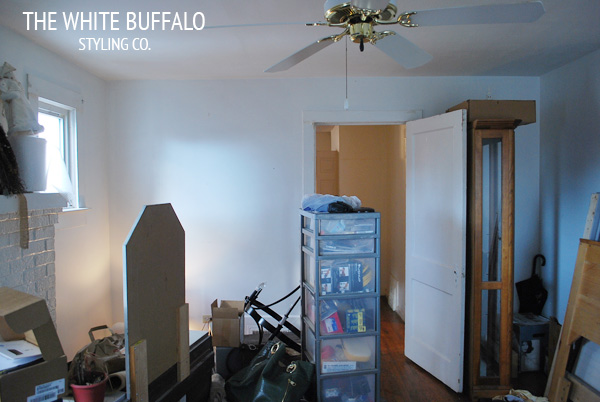
This tiny room was supposed to be the living room and as you can see, the view from the front door was a wall and tiny doorway.
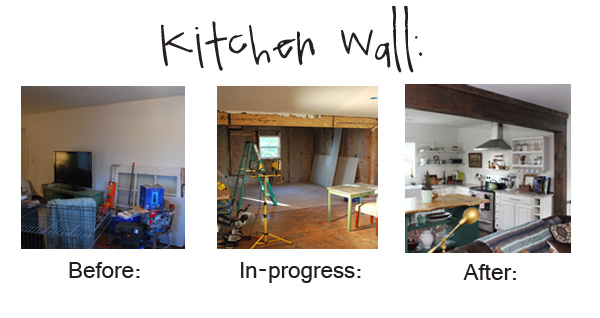
When you went through that doorway, you entered the tiny living room and to your left, you saw this big wall.
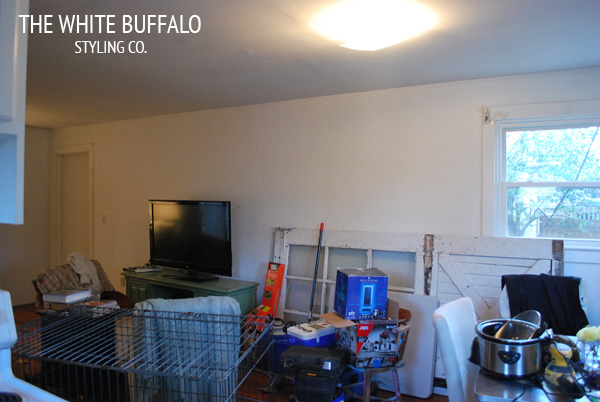
Yep, closed off and choppy.
I apologize for all of the stuff in these before shots. Quick lesson learned: NEVER accept an offer on your house that requires you to be out and moved somewhere else (oh and do a huge list of updates) in THREE WEEKS. We worked and moved around the clock and I didn’t think to get before pictures in that whirlwind until we had our stuff everywhere. Next house: take tons of before pictures with no stuff.
Now, back to today’s post.
On the day we closed, our first order of business was to start knocking these babies down. My husband, being the savvy DIYer and electrician that he is, said the biggest advice for this is to go slowly and be careful. I just assumed you started hacking into walls.
Yeah, not so much.
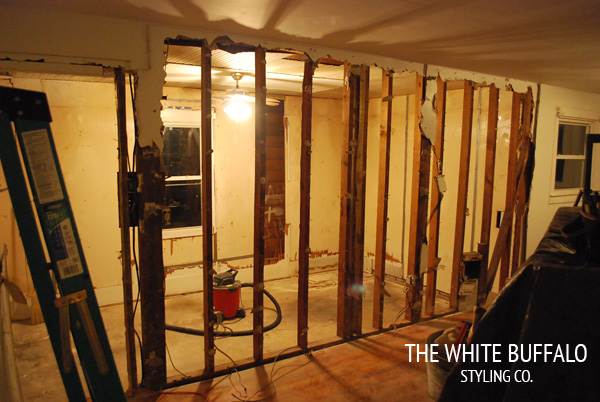
You have to leave all of the studs in place until you brace it with another beam, especially if the wall you’re taking down is 20 feet long like our kitchen wall. You also don’t want to hack through wires, etc. That’s the tedious and not-so-fun part of taking down a wall…you have to deal with whatever you find inside like pesky outlets. Why can’t we just chop those off? Well, Chris handled those, thankfully.
Here’s Day 1 of kitchen wall demolition.
Crazy, right?
As I’ve mentioned before, we used a contractor to help with a lot of this work. We did a ton ourselves and my husband, Chris, seriously did a lot of work.
But, some of what we were doing like adding an addition, was bigger than our expertise. But the biggest factor was time. With us both working full-time, there was no way we could do as much as we would like and still finish within six months or less. It was really important to us to finish these main living areas quickly since we were living through it.
So, Chris took down these walls and our contractor, Nathan, installed the beams in their places.
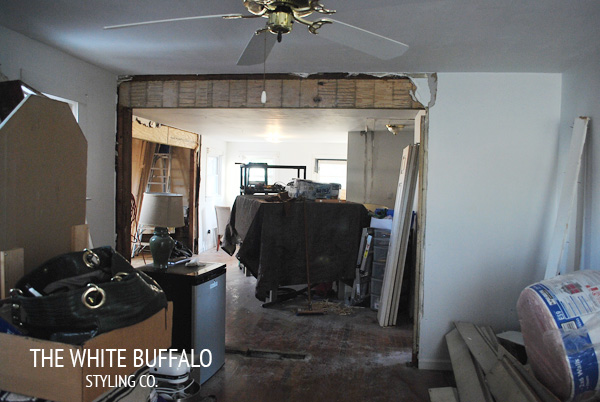
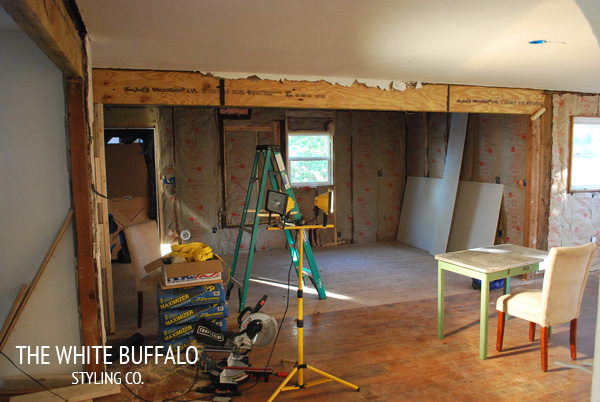
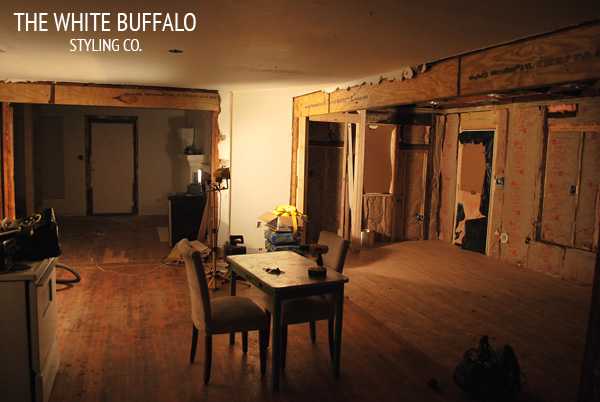
Here’s our in-progress front room:
In-progress kitchen wall:
Yes, we lived in this for a while. Whew.
Our contractor was really great about telling us which walls were load bearing and which weren’t. I really suggest getting a professional opinion on this if you’re doing it yourselves.
We definitely thought the twenty-foot wall between the kitchen and living rooms would need a beam and it did. But we really thought the shorter wall between the front lounge and the living area might be okay.
We were majorly wrong on that one. It was load-bearing and also needed a support beam.
Our initial thought with creating the open concept and getting rid of walls was that we wanted the rooms to just flow into another as if it has always been open. But that would require putting these beams in the attic. I’m still not sure exactly how that would’ve worked, but our contractor told us it could be done.
And that was our plan for the first few weeks of renovation.
And then, the beam idea began to take shape. We mentioned it to our contractor and he said it would be much easier and cheaper to place the beams as you see above instead of putting a twenty-foot beam in the attic. Still don’t know how that would’ve worked…twenty-feet???
Easier and cheaper would’ve been enough for us, but we had really fallen in love with the idea of these openings being separated by some lovely dark wood beams. I was already set on all white walls and really thought the wood would be a contrast.
Here’s one last in-progress shot:
The dining table there is proof that we did live through this reno 🙂
And here’s a little After teaser for tomorrow…
Notice how different the support beam and the final beams look? That’s because they’re faux! I know what you’re thinking…how are they faux if there’s already a beam there? All in due time, my friends.
Make sure you check back tomorrow to hear how we made these faux wood beams and columns!

Wow! That looks so amazing! We also took a wall down (non-load bearing) to open up our kitchen and dining space. I can definitely relate to how tough it can be to live through a renovation (so dusty!). Here is a snapshot of how our space looks after 🙂 http://lemongroveblog.com/la-grande-house-tour/
Love opening everything up! If we didn’t do it, our house would have a totally different feel! 🙂
I love evolving progress pictures! So good!
Looks amazing! I just can’t over that you LIVED through this!!
These pictures remind me of the email Kurt sent while we were at the Pine Crest Inn that said, “Well, there goes the wall,” with pictures of our own wall-gone-beam-instead pictures. 🙂 You were sitting next to me when I got it, too!
I still can’t believe you lived without electricity, heat, and all that for so long, You’re so adventurous!
Wow! So amazing what a difference it’s already made!
I LOVE hearing about all the decisions you made and why you made them…this is a super fun series, girl! xo!!!
That made all the difference! I bet you just love it now 🙂 xo Kristin
I’m so glad you’re sharing all of the behind the scenes. I had somehow felt like I had missed something from following along the reno. I’m paying close attention to all your tips as we’re planning a reno on a ’60s home soon!
So pretty! We are also renovating a boxed in, small room home and have done a lot of demolition!
I love what you are doing! We also have a Dane, and share the love! Beautiful job!
Iam looking to take out a bearing wall that separates kitchen and living room..
The wall measures length is 14 feet.
My question is this:
Is it possible to use a beam without using posts?
What size beam would i have to use for this span?
Hi DAvid! There’s no way to know without actually seeing the space and knowing if it’s load bearing. You’d need to get a contractor’s opinion in person 🙂