

Happy Monday! I hope you all had a great weekend. We definitely did and I am so excited to be back for our second week of the Inspired Design Challenge. This week, we’ve chosen inspiration from Urban Outfitters.
I posted my inspiration and a teaser photo on Saturday. If you didn’t see that post, I was very inspired by these two rugs.
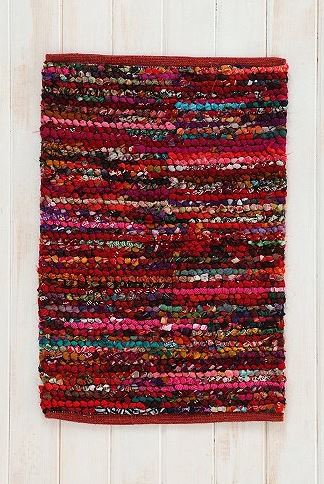
{via}
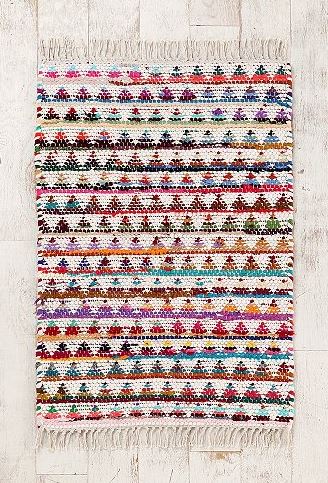
{via}
I love the overall bohemian style these have {if you didn’t see my love for bohemian modern, you can see it here and here.}
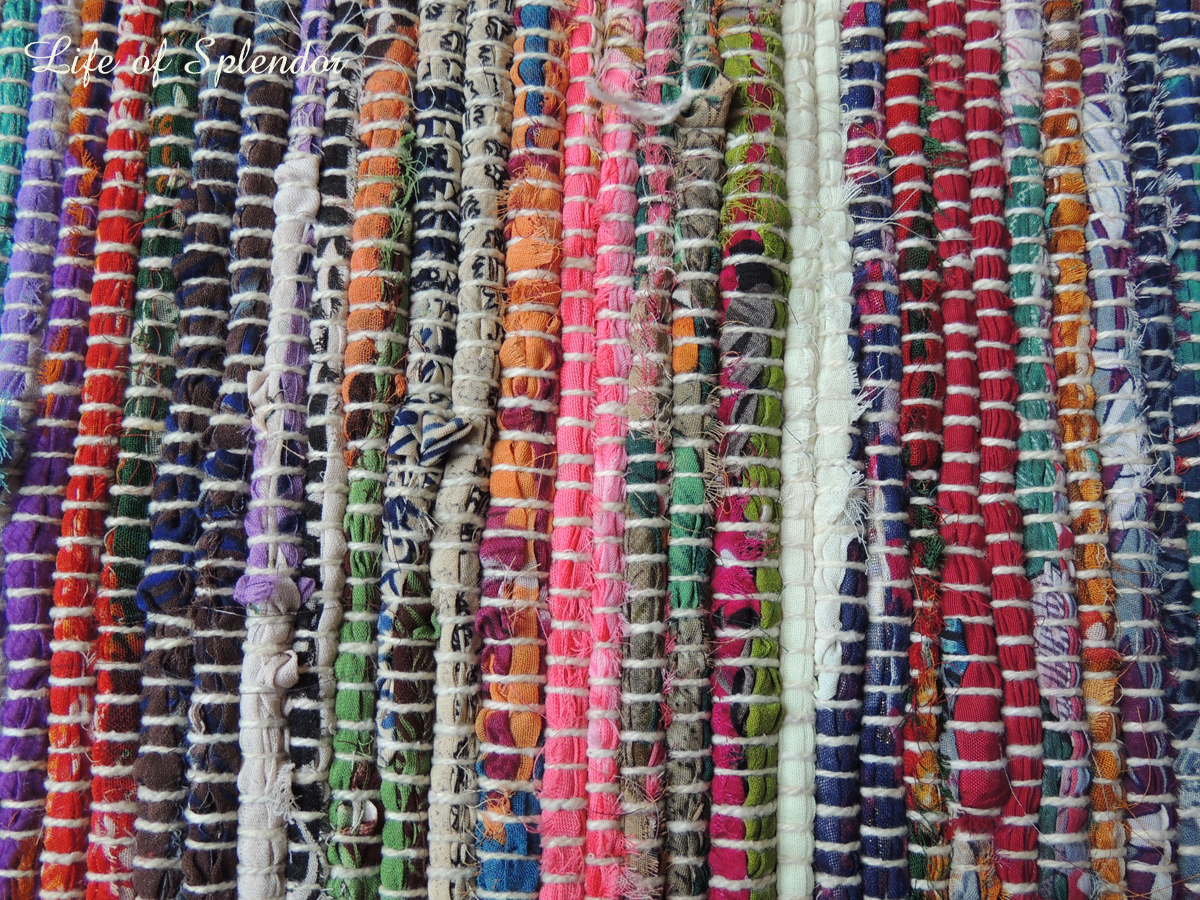
I found these rugs at Garden Ridge for $5.99 each.
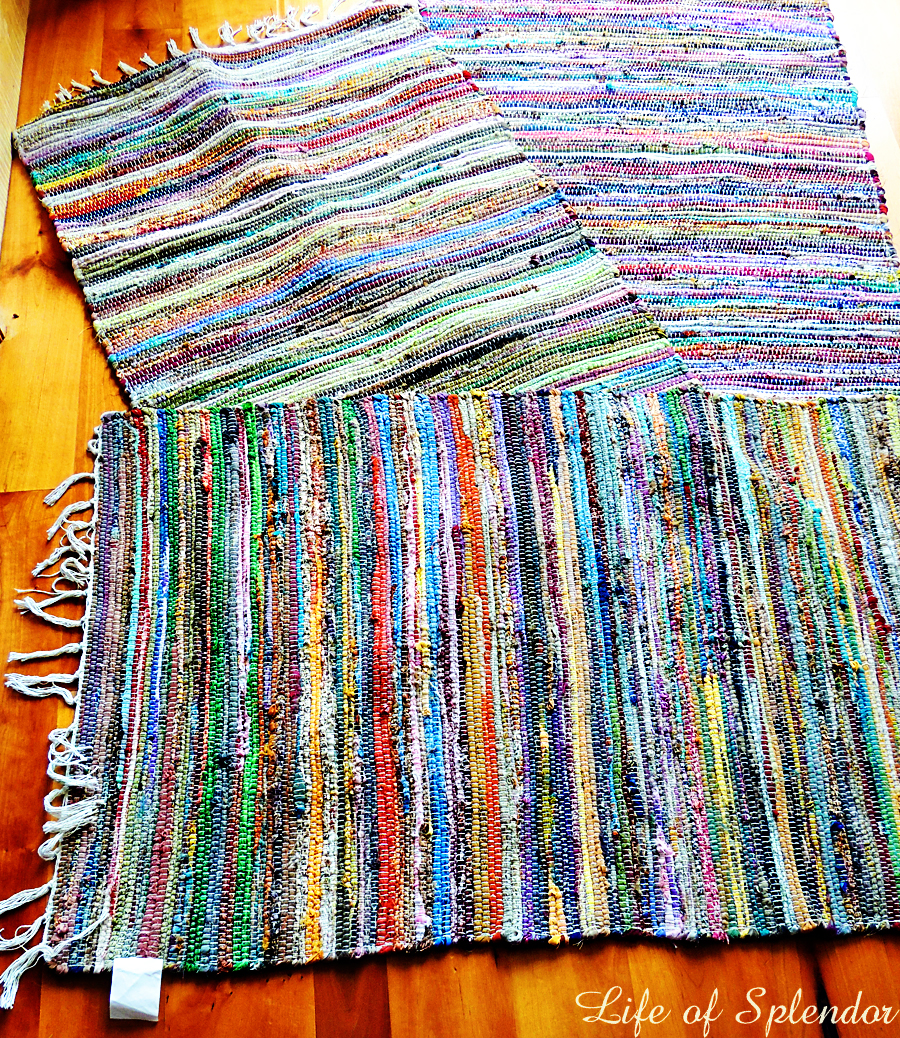
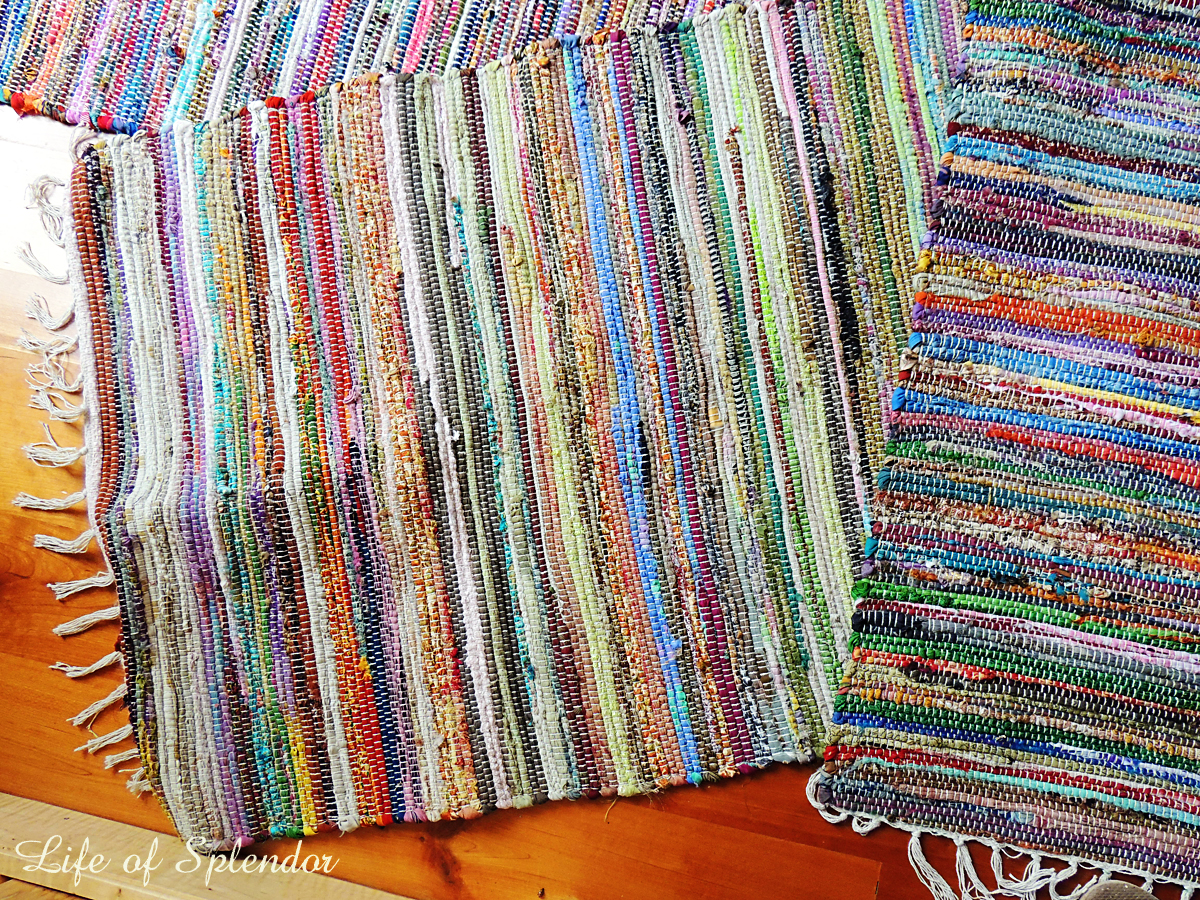
They are rag rugs made up of strips of printed fabric. They remind me a lot of Kantha blankets made up of small strips of saris.
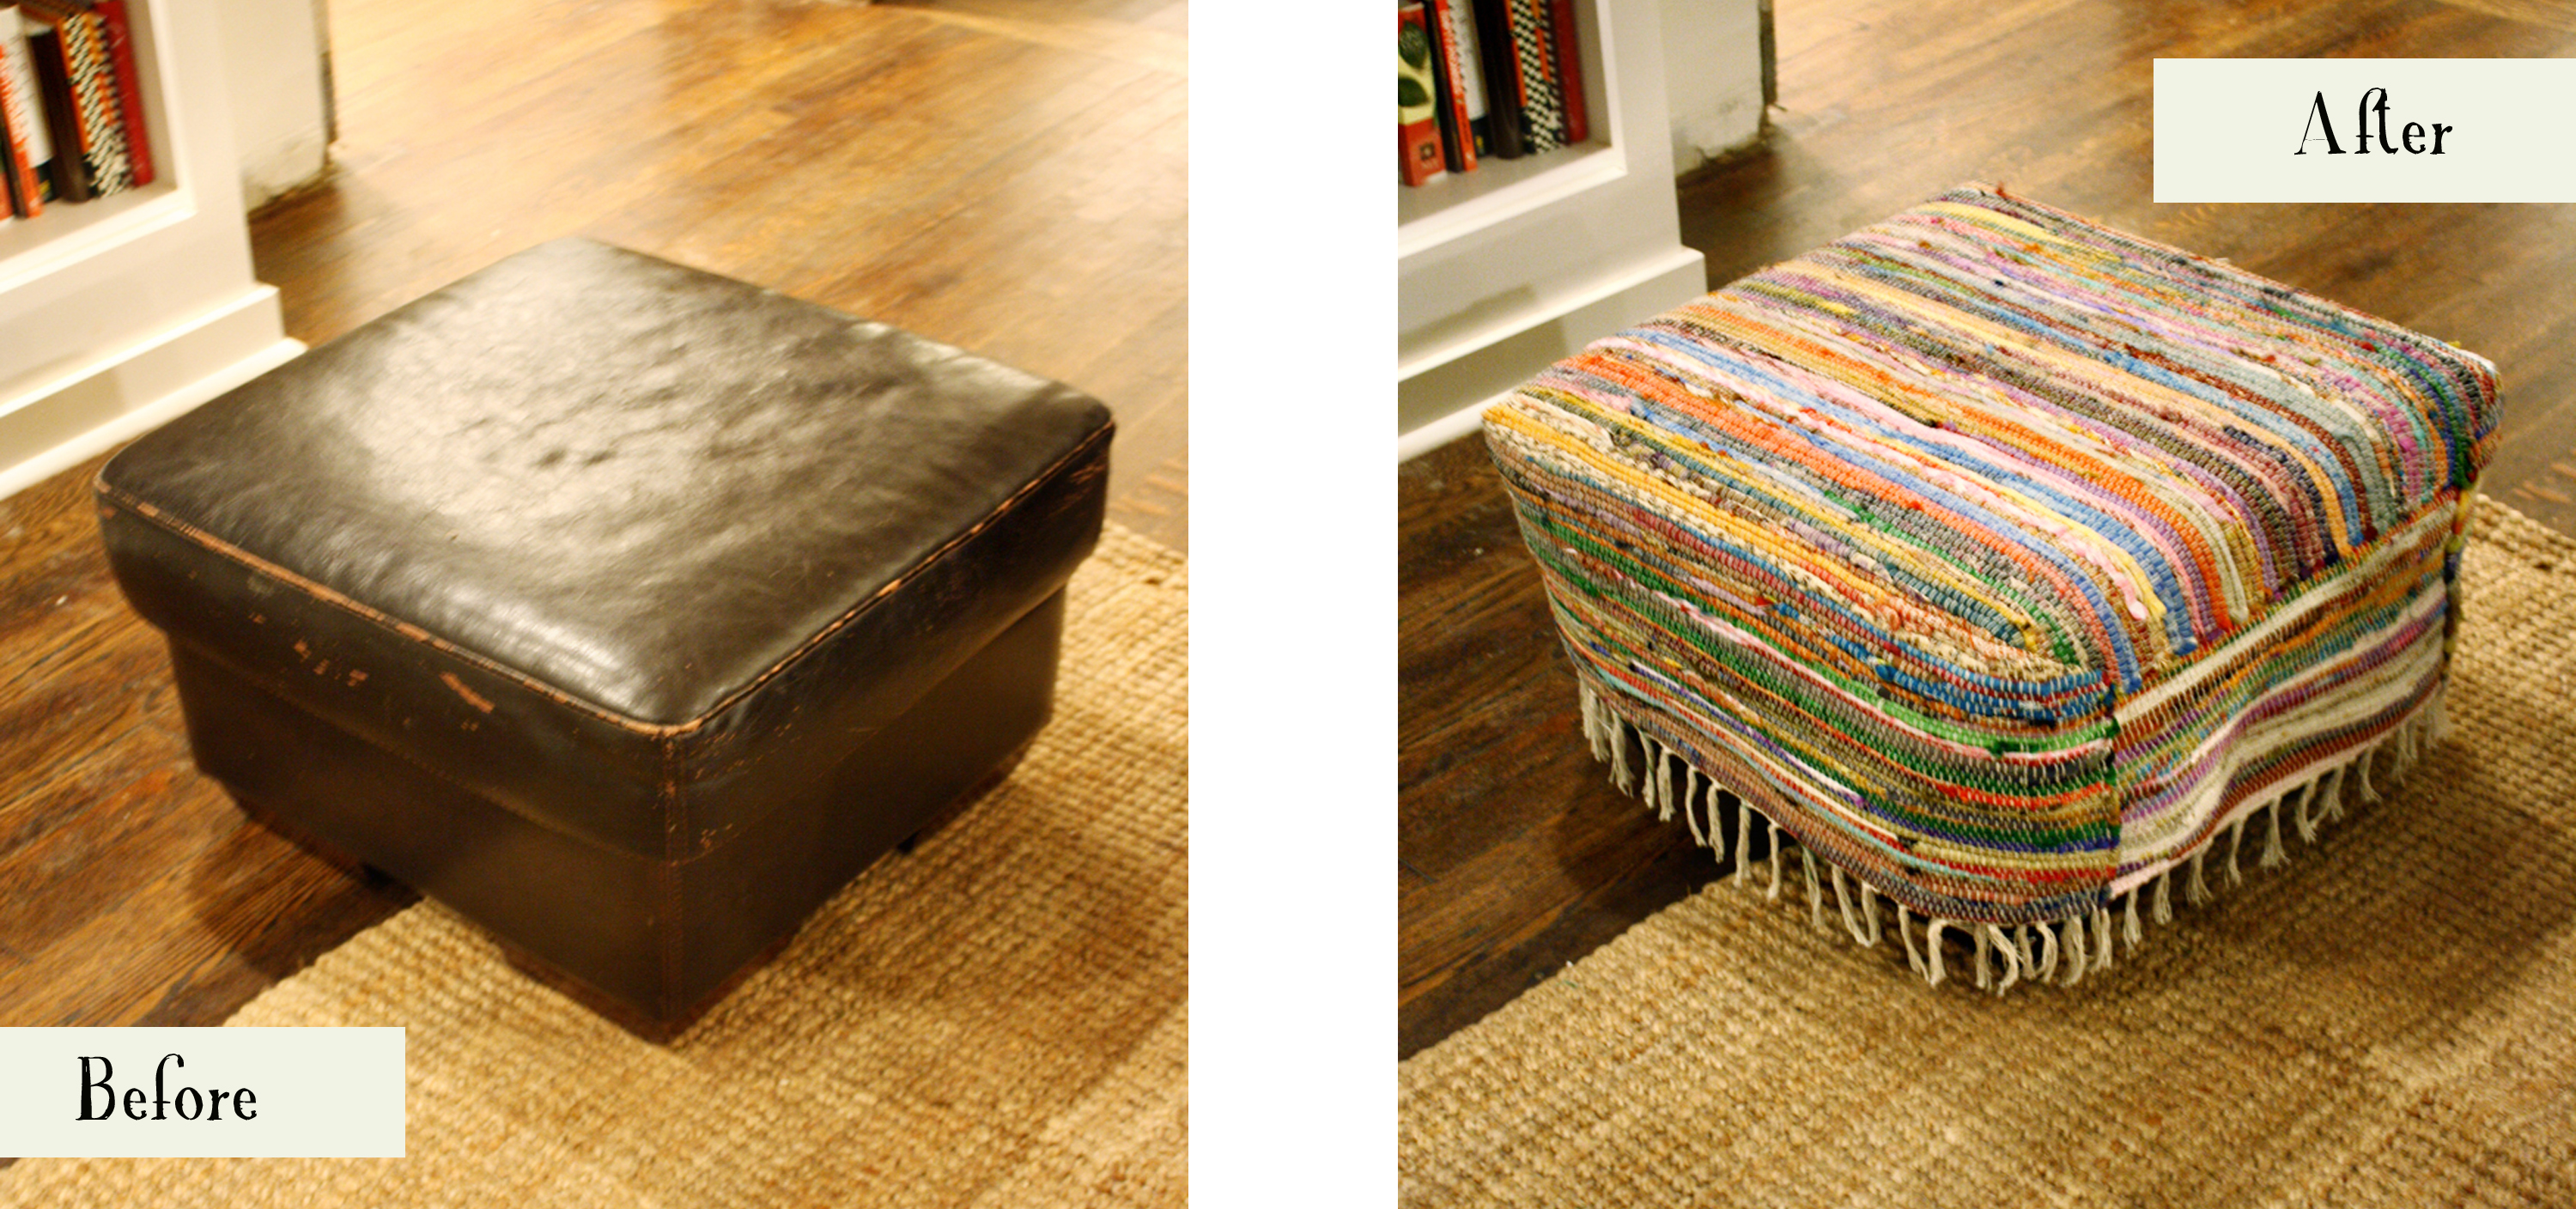
As soon as I saw them, I knew I wanted to do something with them. I considered stitching them together to make a larger area rug, which would be awesome. But then I thought about a leather ottoman that I wanted to recover. What a fun slipcover these rugs would make instead of just regular fabric!
So, here’s what I came up with:
And here’s how we did it:
I first have to give a big thanks to my sweet mama for helping with this project. Our first thought was to cut the rugs into 5 pieces: 1 for the top and 4 for the sides.
We measured and began cutting the fabric and this happened.
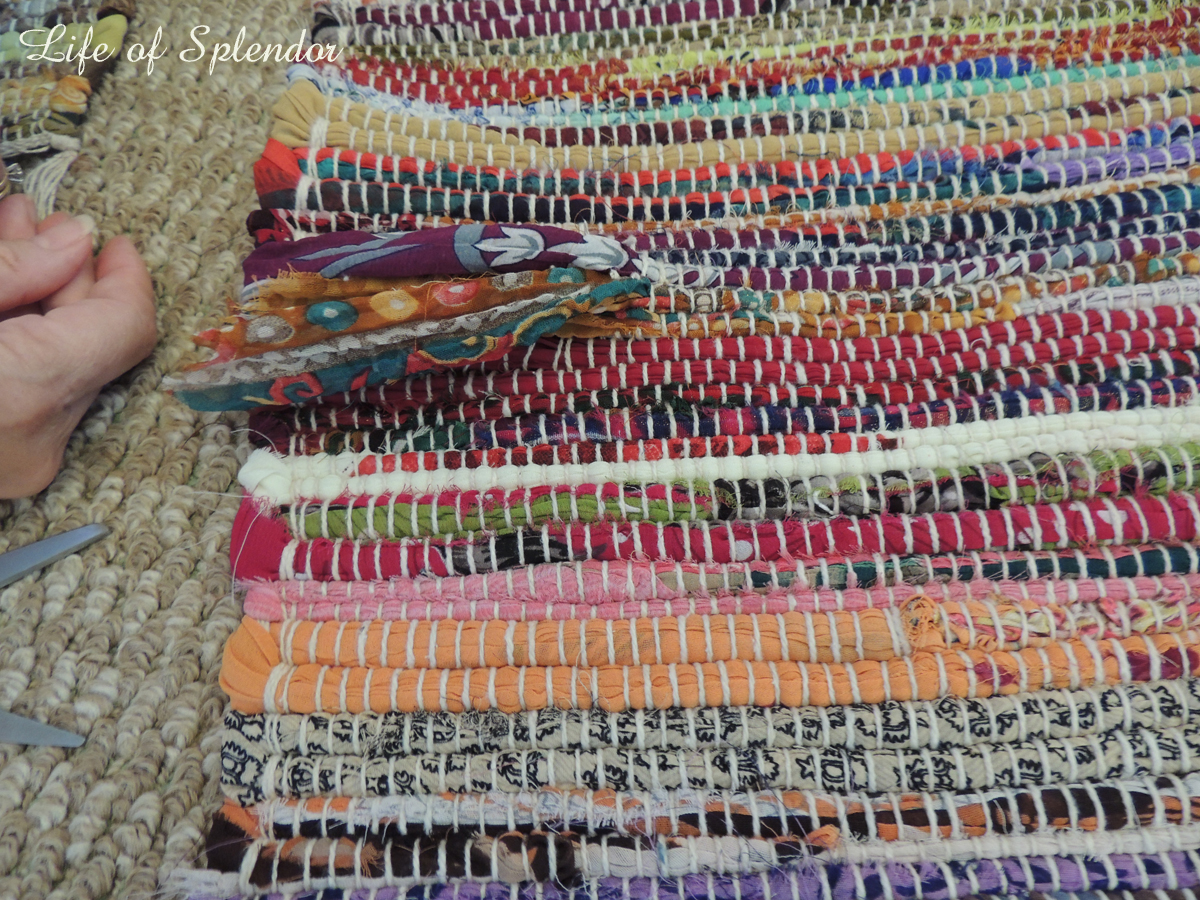
Due to how they’re put together, they immediately fell to pieces when you cut because the white threads run the entire length of the rug, so when they are cut the whole thing falls apart.
My mom is such a creative and talented seamstress and crafter, so she immediately figured out a solution to avoid cutting the rugs.
First, we laid one rug over the slipcover and folded the corners just like wrapping a present.
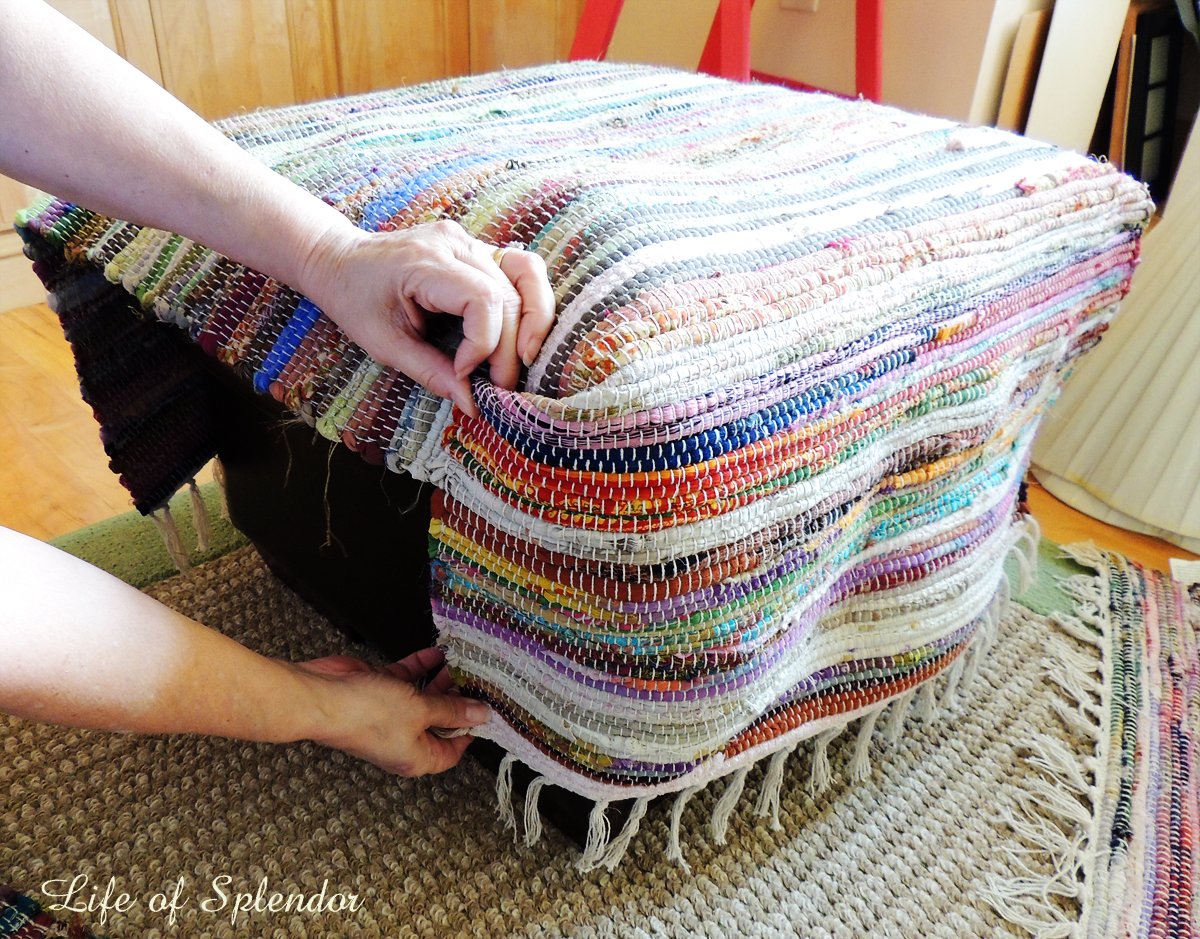
We pinned it and laid the other rug on top to make sure the bottom was even all the way around before stitching anything.
Once we had both pinned, we carefully took off the top one and stitched the corners down on the bottom rug. We stitched it by hand because these rugs were too thick to go through the machine and it would also be a bit difficult with how we were structuring it. After doing that, we put the top one back on and stitched not only the corners, but we also stitched the two rugs together where the top and bottom rug met.
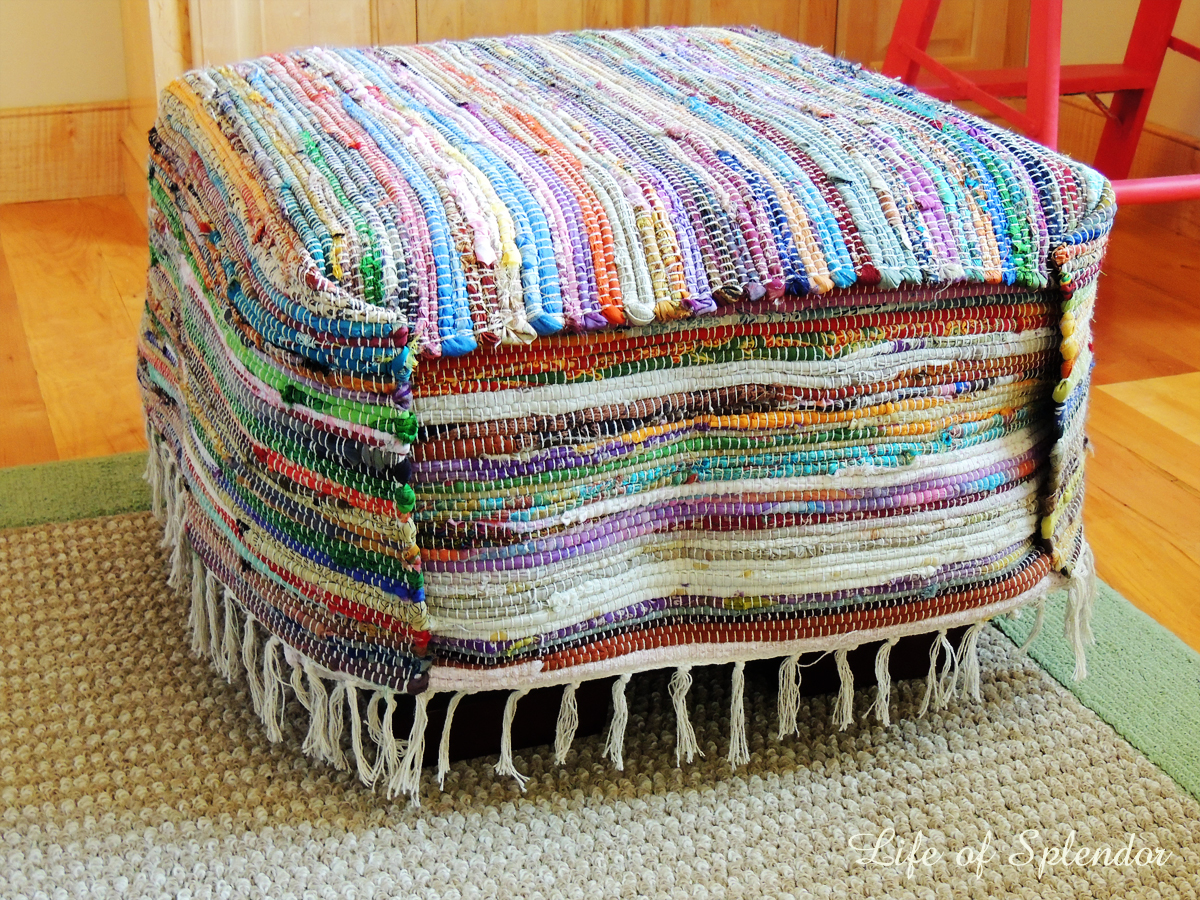
I really love how it turned out.
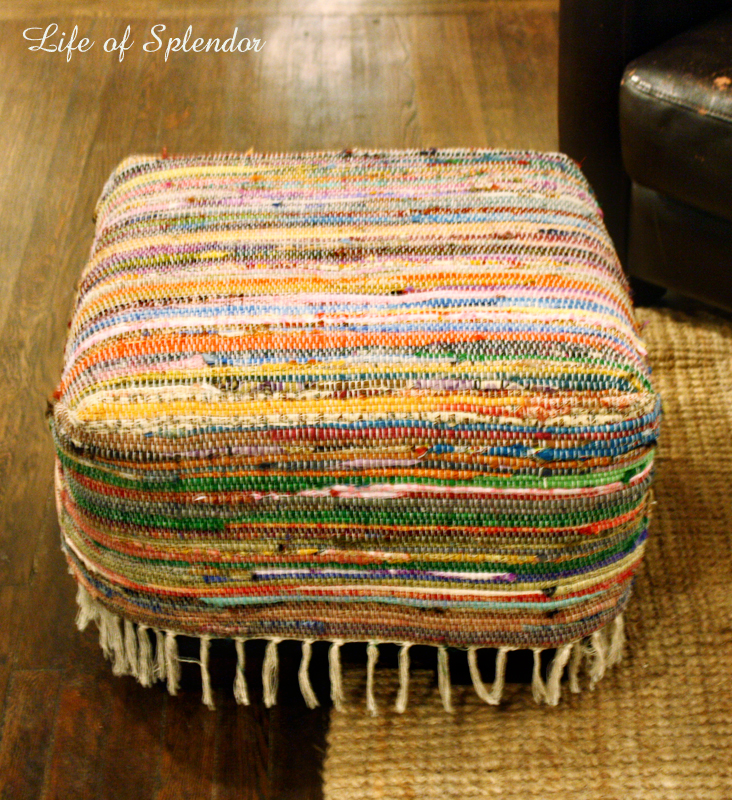
I love the texture and different colors, but probably my favorite part is the fringe along the bottom.
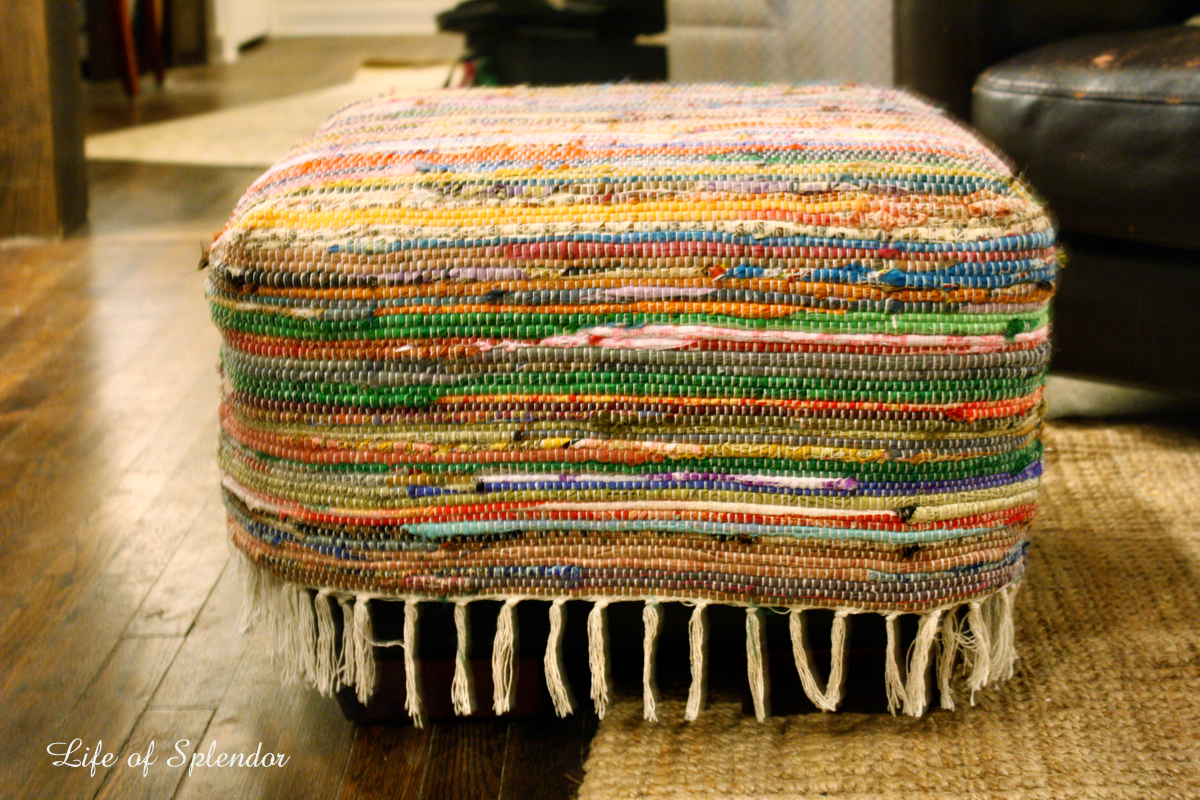
This slipcover only took two rugs, so for $12.00, I took the plain ottoman to something with a bit more bohemian personality.
Make sure you go and check out what my other friends came up with. Here was their inspiration.
1. Jennifer from Brave New Home
2. Angie from Angie’s Roost
3. Kristin from Bliss at Home
4. Sara from Embrace My Space

EEEEEE! This is so amazing I can’t type straight! Wow, I LOVE how this turned out. Such a great adaptation. I’m definitely storing this idea away.
Thanks, Jennifer! Headed over to see yours now 🙂
Great idea. I never thought to use rugs to cover furniture. Bonus it adds a lot of color to the space and since it is a rug should be super durable.
Manda @ Our Wolf Den
Thanks, Manda! I like how it turned out. The project took a little more figuring out than I expected because of how thick the rug was and how it was designed, but we made it work and I’m liking the result!
So fun and hip Lindsay! xo Kristin
Thanks, Kristin!
It turned out great, Lindsay! Love the bright colors.
Thanks, Sara! Loved yours too 🙂
So….much….stupid….love….for….this….project!!!! Oh my goodness this is so awesome! And what is this Garden Ridge store you speak of and why don’t we have one in Maine?! That’s such a great, cheap rug score!
Such a good idea! I would never in a million years have thought of that!
Oh, I love how this turned out! It brings such a great vibe to the room.
Linsday, I just saw your home tour on YHL yesterday and this ottoman caught my eye immediately. I have an upholstered bench that has been sitting in an attic room and has all kinds of strange animal stains on it, and my husband threatened to get rid of it unless I come up with something, and I think this will do the trick. Don’t get me wrong, though, I love the rest of your home, too. I love the white walls with all the wood features. They balance everything out and make your home so warm and cozy. =)
Love this! I’m not very crafty but want to make the slipcover. Please tell the dimensions of the ottoman and the rugs. Did you use an embroidery needle and thread?
Thank you so much!
I have an adorable vintage stool with long, slender, smooth wrought iron legs. Sadly, my new puppy chewed three of the corners so I was going to sew a slip cover, but when I saw this rug idea I squealed with delight! One rug should do it for this wee little thing. Thanks for posting such a fun idea!
Yay, Katherine! I am so happy to hear that! And I will say, we have a Great Dane who thinks this stool is her platform to chew bones and it’s held up really well with the durable rug and bright colors – all dirt is masked!
Wow! What a fabulous project! This will go perfect with my lounge, even the colours match. Thank you for sharing. I finally have something I want to try on my antic daybed on the verandah too!
I bought a really large version of this rug and was going to make several tote bags from it. It’s on hold till I finish what I am working on now. Glad I saw your blog post because, I would have done exactly what you did and been in a state when it came apart. I still want to make the tote bags but, I have to figure out how to get them from this rug and not have it fall apart when I cut it into sections for the bags.
So glad it was helpful Sharon!
Lindsay, I figured out how to cut the rug and have it not come apart. I will iron Heat-N-Bond Ultra Hold to the back some cotton fabric, peel off the paper backing and then iron the cotton onto the back of the rug before I cut it into sections for my tote bags. This should hold the rug ropes together long enough to form the tote bags.
I have done this process before on sweater knit fabric to keep it from unraveling during the tote bag construction, until I saw your post I didn’t think it applied to this rug.
Once again, thank you for saving me from a “what the heck do I do now moment”.
Ooh so good to know! Good luck, Sharon!
Lindsay, The Heat-N-Bond and cotton fabric ironed to the back of my rag rug worked like a charm. I got 4 18″x16″ tote bags from my one rug. The Heat-N-Bond made it possible for the whole rug to stay together when I cut it apart to make the 4 tote bags.
I am so glad, Sharon! That’s awesome news 🙂